The Margin and Index Method: A Step-by-Step Guide to Finding Anything in Your Notebook
This is Part 2 of a 5-part series on notebook indexing, “The Art of Finding Anything.” [View the full series here: Part 1, Part 2, Part 3, Part 4, Part 5]

Table of Contents
- Introduction
- What You’ll Need
- Step 1: Number Your Pages
- Step 2: Set Up the Index
- Step 3: The Indexing Process
- Step 4: The Entry Numbering System
- Step 5: Using Margins Effectively
- The Two-Layer System
- Quick-Start Checklist
- The System Only Works If You Use It
- The Ultimate Guide To Effective Post-Reading Note-Taking
Introduction
In my last post, I talked about how my notebooks had become black holes—full of information I couldn’t retrieve. After experimenting with various approaches, I’ve settled on the Margin and Index Method, which adapts John Locke’s historical system into something more streamlined and practical for contemporary use.
In the Margin and Index Method, you create a simple alphabetical topic index (without extra vowels) and write the header word in the index along with the page numbers. Each time you add a new topic to your commonplace book, record it in the index under the first letter of that subject, along with the page number.
Here’s exactly how I implement it.
What You’ll Need
You don’t need anything fancy to get started:
- A notebook with at least 200 pages
- A pen you like (I mostly use Pilot G2 0.5mm or thinner, so I can write small)
- Optional: a ruler for creating index sections
- Optional: sticky tabs for frequent references
Really, any notebook you have lying around will do. Any regular ballpoint pen will work. Don’t let the lack of perfect supplies stop you from starting.
Step 1: Number Your Pages
Before anything else, number your pages. You can do this all at once when you start a new notebook, or number as you go. You can also use a notebook with pre-filled page numbers.Either way, page numbers are the foundation of the entire system.
Step 2: Set Up the Index
I dedicate the last six pages of my notebook to the index (you can also use the first six—the choice is yours). Here’s how to set it up:
- Divide each of those six pages into four sections
- This gives you 24 sections in total
- Assign each section to a letter of the alphabet, combining X, Y, and Z in the last section
- If you want to combine a few more letters (P and Q, or W and V, for instance), you might be able to get the index down to 4 or 5 pages
Write the relevant letter in each section. That’s it; — your index is ready.
Step 3: The Indexing Process
Now, as you fill the rest of the notebook, you’ll add entries to this index. Here’s my process:
- Create the entry in my main notebook section, making sure the page is numbered
- Identify the key topics or themes from the entry (usually 2-3)
- Add these topics to the alphabetical index under their respective first letters
- Include the page number(s) after each topic
Let me walk through an example. Say I make an entry about the benefits of morning walks and how they improve focus and creativity. I identify the key topics: “morning walks,” “focus,” and “creativity.” Then I add them to my index:
- Under “M”: Morning Walks – 56
- Under “F”: Focus – 56
- Under “C”: Creativity – 56
(Assuming this entry is on page 56.)
Each time I add a new page related to one of these subjects, I simply add the new page number after the existing entry. So “Focus – 56” might eventually become “Focus – 56, 72, 103.”
This way, I can quickly locate all entries related to a specific topic, even if they’re scattered throughout my notebook.
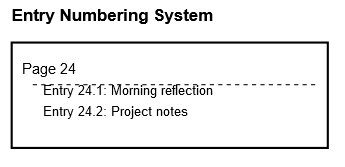
Step 4: The Entry Numbering System
In addition to page numbers, I’ve implemented an entry numbering system that provides even more precise reference capabilities. Here’s how it works:
- Each page receives a standard page number (e.g., Page 24)
- On each page, individual entries are numbered sequentially (e.g., Entry 1, Entry 2)
- The complete reference becomes a combination of both (e.g., 24.1, 24.2)
This dual numbering system offers several advantages:
- Allows for multiple distinct entries on a single page
- Makes cross-referencing more precise
- Helps track the chronological order of related thoughts
- Facilitates more accurate indexing of complex topics
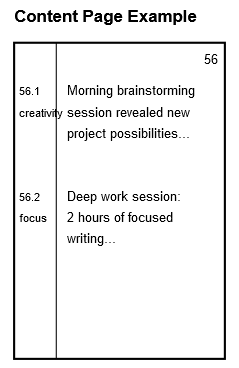
One important note: when adding entries to the index, I only include the page number (e.g., “Stoicism – 24, 35, 42”), not the individually numbered entries. While this sacrifices some granularity in the index itself, it offers greater flexibility when referencing these entries in other notes. I can pinpoint individual points within those pages if needed, especially during cross-referencing.
Step 5: Using Margins Effectively
The margins in my notebook serve multiple purposes:
- Entry numbers for easy reference
- Quick topic identification — key words that link to the index
- Cross-references to related entries (e.g., “see also 56.2”)
- Stars for important quotes or ideas I want to highlight
I keep the margin notes concise but meaningful, using them as bridges between my detailed notes and the index system.
The Two-Layer System
Taken together, this creates a two-layer index system:
Layer 1: Main Index
- Alphabetical sections
- Topics with page numbers
- Cross-references between topics
Layer 2: Entry-Level Organization
- Individual entry numbers (24.1, 24.2)
- Margin notes and topic tags
- Cross-references to specific entries
The main index gets you to the right page. The entry numbers and margin notes get you to the exact idea.

Quick-Start Checklist
Here’s everything in one place:
- Number all pages
- Reserve the first or last 6 pages for your index
- Create 24 alphabetical sections
- As you add entries, identify key topics
- Record topics in the index with page numbers
- Use margins for entry numbers, key words, and cross-references
- Update the index regularly (I recommend weekly—more on that in the next post)
The System Only Works If You Use It
Setting up the index is the easy part. The real value comes from two habits: updating the index consistently, and returning to your notes regularly.
In my next post, I’ll share the weekly review practice that transformed my notebook from a collection of notes into a living document — one that actually helps me think.
The best system isn’t the most complex or the simplest—it’s the one you’ll actually use consistently. Start with this structure, but don’t hesitate to modify it as you discover what works best for you.
Previous: [← Why Your Notebooks Aren’t Working (And What I Learned from John Locke)]
Next: [The Weekly Review That Made My Notebook Actually Useful →]
Read the full series: The Art of Finding Anything: A Complete Guide to Notebook Indexing:
- Why Your Notebooks Aren’t Working — The problem and the landscape of solutions
- The Margin and Index Method — The step-by-step tutorial
- The Weekly Review — The habits that make the system work
- Troubleshooting Your Index — Common problems and fixes
- How to Actually Start — Getting off the fence and building momentum